

My daughter April was nearly 16 when she died so there were lots of clothes to be dealt with. It took me 2 years before I began thinking of making a quilt out of the clothes I couldn't part with. I don't have any friends or family that make quilts so I searched the internet to find out how to do it. I used her baby clothes I'd saved for that future granddaughter, a Minnie Mouse jacket from when she was a toddler, her blue satin choir gown, an embroidery square of a pig that April made, her favorite flannel shirts and other items that had special meaning in her life. Looking at each square of cloth brings back another memory of the happiest moments in my life. I saved all her t-shirts to someday make a small quilt out of just them.
Based on a Queen Sized Quilt
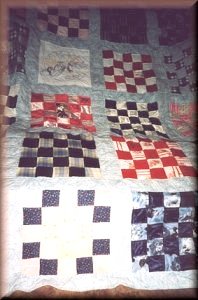
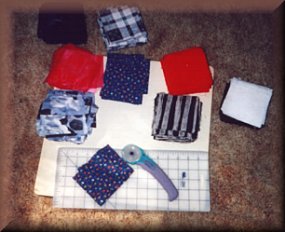
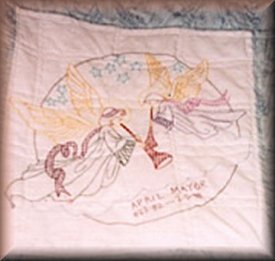
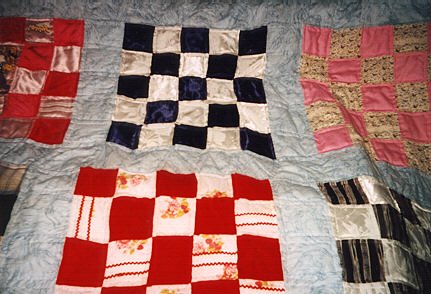
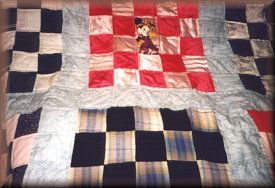
Directions Decide which items of clothing that will be used. Take pictures of the item if you want to first... and remember you are not destroying the clothing but creating a lasting remembrance that you can use. With the seam ripper, take out the hems and open all seams. Iron pieces flat - this will make it easier and more accurate cutting. Cut the material into 4x4 inch squares. Take extra caution with cutter - they are extremely sharp. With the rotary cutter you can also cut 2 to 3 layers at a time. If you have smaller size material you can adjust the square size down to no less than 2 1/2" because you will have a 1/4" of allowance on all sides. Play with the squares and see which ones you like together. Pin 5 alternating squares together into a row. Watching for patterns (if any) in the material - so that the designs are the same direction. Sew these squares to each other. Use a 1/4" seam allowance on all stitches. Step 3 Pin 5 together making a large square block. Sew the rows together. Still making sure your patterns and color placement are right. You can add purchased quilt squares and embroider your child's name and dates on it. Or you can use the fabric paint if you don't embroider. I got this pre-stamped angel square from the local fabric store. Arrange the blocks in the place you will want them. I used the living room floor so I could move them around several times to see what they looked like together. If you want borders around each block like shown here. Cut the material into 4 1/2" wide strips and in the same width as each block. Pin together the row of blocks and border strips, starting and ending with blocks of squares not border pieces. These will make the horizontal rows. Cut long strips of the border material again 4 1/2" wide and the length of the whole quilt. Pin these together starting with the outside border edge and ending with the other border edge. Sew these rows together. This makes your complete top layer of the quilt.
Lay the backing material on the floor (face down). Place the quilt batting and then the top layer (facing up). Adjust the 3 layers so that it is even with each other. Starting on one end of the quilt - safety pin the 3 layers together working your way across the whole quilt. Be sure and use enough pins and spaced close enough so that the quilt will stay aligned when it's picked up. I used the sewing machine and did a solid row of stitches using a 1/4" allowance from each seam. This comes out like a square design on the inside and outside of each square. Starting in the middle of the quilt sew 2 rows lengthwise and 2 rows across to anchor the whole piece. If you are working with a large quilt roll one end of it so it will fit into the sewing machine. Work from each anchor row of stitches to the edge until both directions of rows are done. Finishing the edges. Pin the top and back edges together folding the raw edges inside. Sew one row around the whole quilt 1/4" from the edge. Then sew another row 1/4" in from the first edge row. Clip all the strings and you now have a beautiful quilt of memories to wrap up in.
 Step 1
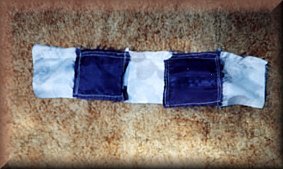 Step 2
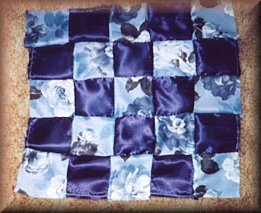
 Step 4
 Step 5
Step 6 Step 7
Step 8


|
Copyright © 2000-2009 Marvel Creations. All Rights Reserved. All matching images and content of this website are © Marvel Creations and may not be reproduced. This web site was created and designed by Marvel Creations 2000-2009 which began May 29, 1996. These graphics are for the "exclusive" use of My Parents Are Survivors. Please do not take! Thank you!
|