

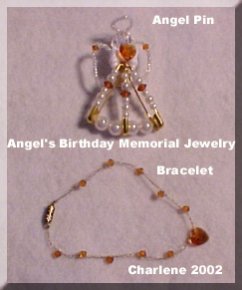
~Angel Pin~
First prepare your safety pins with combination of beads as shown in picture. When you have your safety pins ready attach the bottom by cutting a piece of gold wire and fastening it to one pin. String two pearls on the wire between safety pins and run wire through the center of the middle pin head and string two more pearls and fasten to the last pin. Make sure and keep wire pulled tight.
Cut a long piece of gold wire and using the clear iridescent beads make a halo on one end of the wire. Be sure and twist it tight. Next run the long piece of wire through the 10mm head bead and down through a bow tie bead. To secure this all together be sure and pull the wire tight and go through the bow tie again with the wire. When you have done this go through the ends of the three safety pins and draw together. Take the wire through the pins several times to attach.
Wings: Cut a long piece of gold wire. Attach this through the safety pins in the back of angel. Now for each side string the clear iridescent beads with the one birthstone bead to form wings. You will make each wing separately. When you have strung the beads run the wire back through the pins and secure.
Finishing: Using the E6000 glue, glue a birthstone hart to front of bow bead. Glue a pin to the back of angel. This will need to set for several hours. Your pin is ready to wear when glue sets.
~Bracelet~
This bracelet is made by crocheting wire and attaching beads. Be sure and string your beads onto the wire before you begin crocheting. The size of bracelet and amount of beads will depend on size you need. This one is made using 10 birthstone beads and one heart. I strung five beads, heart bead, five beads. The bracelet is made by doing a chain crochet. Chain 4, add a bead, until you add the first five beads. Chain four, add the heart bead and continue till you have added the last five beads. Attach jewelry fastener. Bracelet is ready to wear.
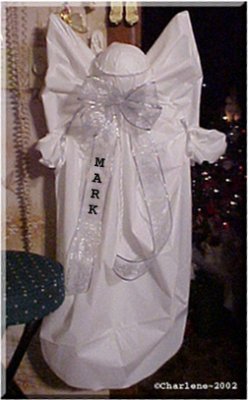
Preparations: Using wire cutters, cut the hook part off the clothes hanger. Leave the straight twisted part. Put glue around the straight twisted part and push Styrofoam ball down onto clothes hanger. This will be the head.
Wings: Take two clothes hangers (hooks facing each other) and over lap the hooks and use the wire to wire the hangers together to form wings. Cut table cloth in half and wrap half around the hangers to cover and fashion wings. Now you are ready to begin making your angel.
Directions: Take tablecloth and drape it over the hanger with Styrofoam ball on it. Use a small piece of wire and fasten it around the tablecloth at the bottom of the ball to tie on (this will be the neck of the angel).
Take the wide ribbon (really long piece) tie around the neck and fashion a pretty bow. Using the craft cord and glue apply a halo to top of head.
Now lay angel on a flat surface and placing a piece of cardboard behind the ribbon and using the black paint, write your childs name onto the ribbon. Allow your ribbon to dry.
You are ready to attach wings.
Finishing: To attach the wings to the angel use a piece of craft wire and go around the head and through the wire at the center of wings. Be sure and make wire tight. Hide the wire that goes around the head under the wide ribbon. You can also tie a long piece of the craft cord around the neck to hang down the front of angel for extra decoration. You could add your child's Heaven date or birth date to the ribbon.
Note: I would like to thank Craftpals BirdieKity for sharing a ghost she made from a tablecloth and inspiring Craftpals Froggy to help me come up with an angel to use here.


|
Copyright © 2000-2009 Marvel Creations. All Rights Reserved. All matching images and content of this website are © Marvel Creations and may not be reproduced. This web site was created and designed by Marvel Creations 2000-2009 which began May 29, 1996. These graphics are for the "exclusive" use of My Parents Are Survivors. Please do not take! Thank you!
|